When a property feed runs, a lot happens quietly in the background.
From the outside it may look like listings simply appear, update, or disappear. In reality, each import follows a deliberate sequence designed to prioritise data integrity and consistency.
This article explains what happens behind the scenes when a property feed runs using the Houzez Property Feed plugin, from the moment it’s triggered to the point where listings are updated on the website.
How a Property Feed Is Triggered
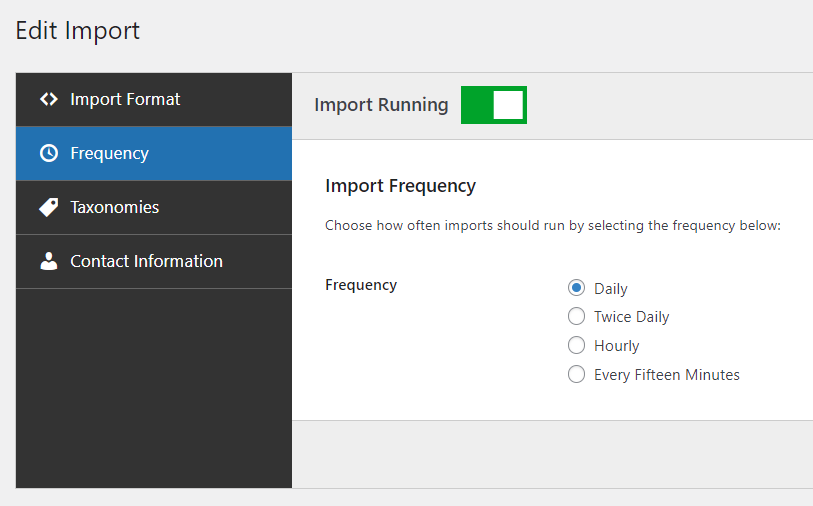
Imports run automatically and their frequency can be specified when you setup the import as to how often you want them to run:
The process is initiated using WordPress’s standard scheduling mechanism. This means:
- Feeds run within the normal WordPress lifecycle
- They respect server availability and hosting constraints
- They behave consistently with other background tasks
Using the built-in scheduling system helps ensure imports are predictable and compatible with typical WordPress environments.
Step 1: Retrieving and Parsing the Feed
Before anything is written to the database, the feed is retrieved and parsed in full.
Depending on the CRM we’re importing from with, this might involve:
- Fetching data from a third-party URL
- Making one or more API requests
- Reading a file delivered to the server
At this stage, the focus is on validation, not importing.
The feed is parsed to ensure:
- The data is structurally valid
- Required fields are present
- All properties can be accessed successfully
- Properties that shouldn’t be imported are filtered out
If the feed cannot be fully retrieved or parsed, the import does not proceed. This avoids partial updates and inconsistent states.
Step 2: Preparing the Data for Import
Once all properties have been successfully parsed, they are held in memory and prepared for import.
At this point:
- No changes have been made to the website
- No listings have been created or updated
- The system has a complete picture of what the feed contains
This separation between parsing and importing is intentional. It ensures that updates only begin once the full dataset is available.
Step 3: Identifying Existing Properties
Before creating or updating any listings, the plugin checks whether each property already exists.
This is done using the unique identifier provided in the feed.
That identifier is what allows the system to distinguish between:
- A genuinely new property
- An existing property that needs updating
Consistent identifiers are the foundation of reliable updates. Without them, it becomes impossible to safely match incoming data to existing listings.
Step 4: Creating or Updating the Property Record
Once a property is identified:
- New properties are inserted with their core post data (such as title and description)
- Existing properties are updated rather than duplicated
This step deals only with the core property record. It establishes the listing itself before any additional details are applied.
Step 5: Updating Property Details and Classification
With the property record in place, additional data is applied:
- Post meta is updated (for example bedrooms, bathrooms, prices)
- Taxonomies are assigned (such as property type, status, and location)
- Existing values are replaced or adjusted as needed
Handling these elements separately allows the system to update individual aspects of a listing without needing to rebuild it from scratch.
Step 6: Importing Media
Property images and other media are handled after the main listing data.
This is one of the more resource-intensive parts of the process, as it involves:
- Downloading media
- Creating WordPress attachments
- Generating image sizes
- Associating media with the correct property
By handling media after core data, the system ensures that listings exist and are identifiable before images are processed.
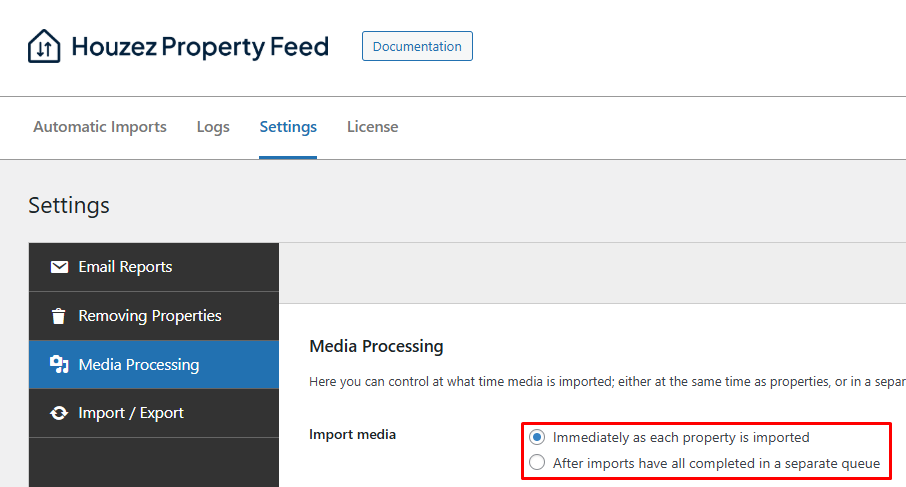
Due to how resource-intensive this process is, you can opt to download and process media in a separate background process, separate from the main property import:
Step 7: Applying Custom Field Rules
If any custom field rules are defined in the import settings, they are applied once the property data and media are in place.
Running these rules at this stage after the import has been imported ensures they operate on a complete, up-to-date version of the property.
Step 8: Removing Properties No Longer in the Feed
At the end of the run, the plugin compares the imported properties against the existing listings. This ensures properties that are sold, let or withdrawn are removed from your website accordingly.
This ensures the website reflects the current state of the source data, not just additions and updates.
Logging and Transparency
Throughout the entire process, detailed logs are maintained.
These logs record:
- When the feed started and finished
- What actions were taken
- Which properties were added, updated, or removed
- Which fields were altered
- What media was imported
- Any issues encountered along the way
Logs provide visibility into what happened during a run and make it easier to diagnose issues or confirm that updates completed as expected.
A Predictable Process by Design
The key thing to understand is that a property feed run is not a single action – it’s a controlled sequence.
Each step builds on the previous one:
- Data is validated before it’s used
- Listings are identified before they’re changed
- Media and rules are applied after the core data exists
- Clean up happens only once the full picture is known
This approach prioritises consistency and reliability over speed, which is essential when a website is being updated automatically.
In Summary
When a property feed runs, the goal isn’t just to move data from one place to another. It’s to keep a website accurate, stable, and predictable over time.
Understanding what happens behind the scenes when importing properties makes it easier to trust the process and to make informed decisions about how feeds are configured and scheduled